


How To Schedule WhatsApp Messages On Android and iPhone
How To Schedule WhatsApp Messages On Android and iPhone
In this step-by-step guide, you will learn how to schedule WhatsApp messages on Android and iPhone.
WhatsApp is a free, secure and widely-used messenger app across the globe. It hosts various features that include WhatsApp link to message, sending images, audio and video files. In addition to this, individual or group audio-video calls have taken WhatsApp to the next level. A key feature like scheduling WhatsApp messages on Android and iPhone is missing from the app.
In this digitally congested life, unlike the business WhatsApp auto reply, the need to schedule WhatsApp messages has become an essential feature. Whether it is to wish someone in the middle of the night or set a reminder for a task to be performed on the next day, the scheduling feature is much needed for WhatsApp users.
The WhatsApp Business API is continuously evolving. Thankfully, with the help of third-party apps, you can now schedule WhatsApp messages. You can be an iPhone or Android user, these apps do the job.
Schedule WhatsApp messages on Android phones
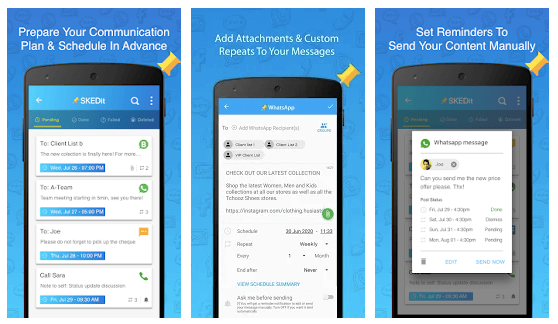
There are plenty of third-party apps to schedule WhatsApp messages on Android phones. We recommend using SKEDit as it’s popularly used worldwide. It even lets you schedule SMS, Emails and Call reminders.
A quick highlight of SKEDit app:
- Price: Free / In-app purchases
- Space required: 17 MB
- Compatibility: Android 5.0+
- Message schedule limit: Unlimited
Below are the steps to schedule messages on Android –
1. Install the SKEDit app from Playstore and open it.
2. Signup using your personal details.
3. When you have signed in, click WhatsApp from the app menu.
4. You have to now grant the following permissions in phone settings: Enable Accessibility > SKEDit > Toggle on Service > Grant Allow. You may return back to the app now.
5. In order to schedule a message, you need to add the recipient name, enter message details and schedule a date and time. You can even repeat the message frequency to daily, weekly and monthly.
6. You can even review your decision before sending a scheduled message. When you click the “Ask me before sending” option, you will receive a notification before the message is sent.
7. If you’ve disabled the “Ask me before sending” option, you will be required to disable the phone screen lock. You will also be asked to turn off the phone battery optimisation feature.
Caution: Performing this step can send WhatsApp messages automatically but there is a privacy concern. As there will be no screen lock, privacy can be an issue. Therefore, this option can be the least prioritised step.
Suggested Reading: How to Use WhatsApp Web for Business?
Schedule WhatsApp messages on iPhone
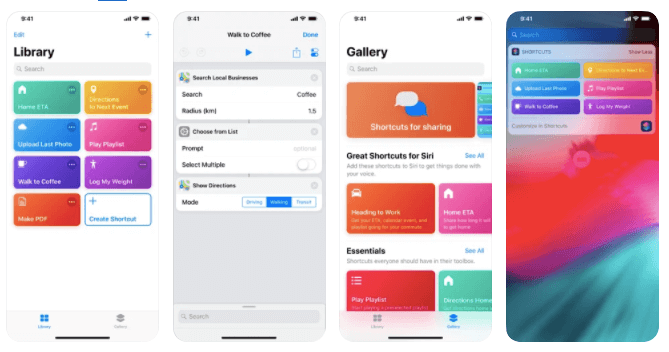
Scheduling messages on the iPhone isn’t as convenient as using third-party apps on Android. Apple is more concerned about the user’s privacy and hence they don’t allow permissions to third-party apps. However, with the help of Siri shortcuts, iPhone users can perform this function.
A quick highlight of the Shortcuts app:
- Price: Free
- Space required: 142 MB
- Compatibility: iOS 12.0 +
- Message schedule limit: Up to 1 week
Below are the steps to schedule a message on iPhone –
1. Install the Shortcuts app on your iPhone’s Apple App Store.
2. Open the app and click on the Automation button that is situated at the bottom.
3. Select the + icon which is at the top right corner of your screen and then click “create personal automation”.
4. After creating personal automation, you need to press “time of day” to schedule your automation. Later, choose a date and time to send WhatsApp messages. When this step is completed, you need to click next.
5. Select “Add Action”, and later go to the search bar by typing “Text”. From the dropdown, you need to select “Text”.
6. You will be required to insert message details in the text field. Message can be of any context.
7. When the message has been inserted, you need to select + icon which is below the Text field. A window will pop out in which you need to type “WhatsApp” in the search bar.
8. When the dropdown appears, the user needs to choose “Send Message Through WhatsApp”. Select the recipient name whomsoever you wish to send a message and then toggle to Next > Done.
9. You will be notified by the Shortcut application at the time the message was scheduled. After clicking the notification, the user will land on the scheduled campaign message window and then you have to click “Send”.
Suggested Reading: How-To Set Auto Reply For WhatsApp: 2021 Guide
To wrap it up
Both the methods are not completely automated, considering the privacy issue on Android apps. However, these applications will do the job which was required to. Scheduling WhatsApp messages on Android and iPhone have never been easier.
If you enjoyed reading this content, you’d probably also love to check out our Comprehensive Guide to WhatsApp Customer Support.


Thank you so much. God bless you.